
Lookup tables can transform plain video into a distinctive visual style within seconds. Push the effect too far, and skin tones, shadows, highlights, and colors suffer. Choosing a suitable 3D LUT starts with checking exposure, balance, and source quality.
Filmora video editor offers strength controls that help prevent harsh or unnatural results. This guide covers each step to create polished color without an overgraded look.

Part 1. Correct Obvious Problems Before Applying the LUT
Good source quality helps 3D LUT Filmora presets produce balanced color results. The table below covers key problems you should correct before applying presets:
| What to Check | What to Aim For |
| Exposure | A picture that is neither clipping at the top nor lost at the bottom |
| White Balance | Whites and grays reading as neutral rather than warm or blue |
| Contrast | Detail still visible in the brightest and darkest parts of the frame |
| Highlight and Shadow Detail | Texture surviving at both ends of the range |
| Saturation | Colors that look plausible before any style is added |
| Color Casts | No single tint sitting across the whole picture |
Every adjustment needs consistency, not perfect color across the entire video. A stable starting point prevents presets from compensating for unseen color problems. Follow the Filmora color correction guide to understand key adjustments for improving your source footage.
Note: When saturation needs lifting, try Vibrance before the saturation slider. Vibrance emphasizes muted colors more than saturated ones, helping reduce the risk of unnatural skin tones before applying a preset.
Part 2. Choose a LUT That Matches the Footage
Most overgrading happens when a 3D LUT does not match source footage. Let’s review 5 important checks before applying any preset to your video:
- Technical or Creative: Conversion presets normalize footage, while creative options add style and may intensify existing adjustments.
- Log or Standard Footage: Presets designed for flat Log material can overwhelm standard phone or camera clips.
- Camera Profile: Certain LUTs target specific camera profiles and may shift colors on unsupported footage.
- Preview Against Your Own Frame: Marketing previews use different footage, so test each option against your actual frame.
- Licensing: Free LUT packs may restrict commercial use, so review licensing terms before client projects.

The Filmora 3D LUT resource explains how LUTs can create distinct looks across different video projects. Imported packs can be organized under editing presets, where thumbnails make it easier to tell one file from another. Naming them by source saves opening 6 before finding the right one.
Part 3. Apply the LUT in Filmora
The 3D LUT Filmora applies remains active on clips until final export. Follow the steps below to apply and control the effect with confidence:
Step 1. Import and Select the Clip
Once you create a new Filmora project, press “Import Media” to import the clip and drag and drop it onto the timeline.
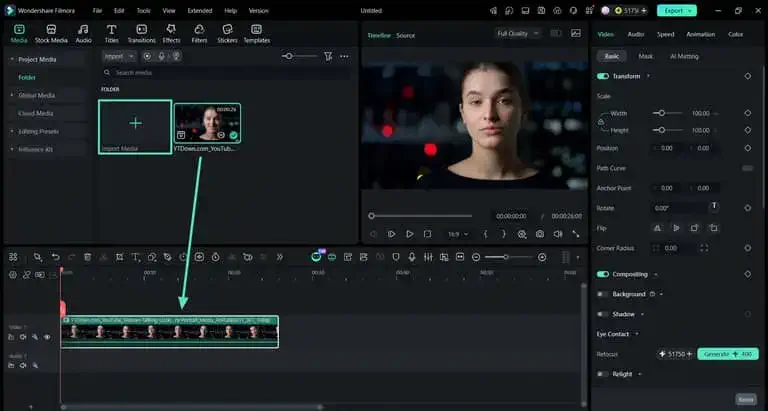
Step 2. Open Color and Enable LUT
Then, move to the right-side “Properties” panel and switch to the “Color” tab. Press the “Basic” tab and turn on the “LUT” option.

Step 3. Choose a Preset and Preview Several Points
Pick a preset and move the “Playhead” to different points in a clip. A preset may look good in one scene but bad in another.

Step 4. Pull the Strength Back
If the LUT effect seems too strong, use the “Strength” slider to decrease the effect. Most presets are built stronger than a finished video needs. Wondershare suggests around 60 to 80% for dialogue and interview footage.

Step 5. Compare Against the Original
Set the LUT dropdown to None and check the original frame first. Then switch back and see whether the LUT makes the shot better. Once the video is finalized, press “Export” to save the video.

Part 4. Protect Natural Skin Tones Where Appropriate
Faces can expose a heavy 3D LUT because skin colors shift fast. Viewers notice strange skin tones even when other colors seem fine.
Where the Control Sits
Filmora places a Protect Skin Tones slider directly under the LUT section in Color and Basic. Raising it holds skin closer to its original range while the rest of the picture keeps the graded look. A value box beside the slider accepts an exact number if you prefer.
What It Cannot Guarantee
The control reduces unwanted color shifts but cannot remove every skin issue. Mixed lighting and strong presets can still make faces look quite unnatural.
Raise the slider in small steps while watching a close-up face. Stop when skin looks natural before the setting weakens your chosen look.
Part 5. Check for Signs of Overgrading
Overgrading becomes clear when colors, shadows, highlights, or skin look unnatural. The table below shows differences between balanced and overgraded video results:
| A Controlled Look | An Overgraded Look |
| Skin holds a natural range of tones | Faces drift orange, red, or waxy |
| Saturation reads as rich | Colors look painted onto the image |
| Shadows keep visible detail | Dark areas collapse into flat black |
| Highlights retain texture | Bright areas lose all detail and go white |
| Neutral objects still read as neutral | White or gray objects take on a tint |
| Shots match across the sequence | One shot stands out from its neighbors |
| Product colors stay recognizable | Brand colors shift away from their reference |
Part 6. Export a Short Color Test
A 3D LUT Filmora preview can appear different across displays. This is how you can test your colors before exporting the entire project:
- Choose a Section: Include a close-up, a wide shot, and any scene with difficult lighting.
- Watch on the Intended Display: A look built for a laptop can behave differently on a television or a phone.
- Match the Viewing Conditions: Shadow detail that survives in a dark room can vanish in daylight.
- Check Different Devices: Review the color test on multiple available displays to identify noticeable shifts before committing to the final grade.
- Only Then Apply It Widely: Grading a whole project before this check means redoing it if the look does not hold.
Conclusion
A convincing look starts with stable footage and a well-matched preset. Choose a 3D LUT designed for the source you are grading. Reduce its strength in Filmora until the effect stops drawing attention. Check faces, neutral objects, and the exported file before trusting results.
Also Read: 5 Ways Filmora9 Helps Video Editors Grow | Wondershare Filmora 9 Review

